Although "T" - budding is most common among all budding methods, much skill is required for the success of the method. In many plant species, the flaps of bark even break apart while making the matrix and inserting the bud piece in that.

In the present article, some innovation of "T"- budding has been presented which appears to be performed relatively easily and a chance of breakage of the bark flaps in performing the operation may be less.
Bud - grafting which is commonly known as budding is a conventional method of propagation in many horticultural plants, in which the bud-piece that contains a piece of bark, a vegetative bud, and a short piece of petiole is grafted on the rootstock.
There have been a number of methods of budding that are known to be practiced in plants belonging to different species or varieties. In accordance with the procedure involved in the methods, appearance of the bud-piece, and other factors, in horticultural terminology, these are referred to as "T" budding (Syn. Shield-budding), Inverted "T" - budding, Patch-budding, Forkert- budding, Modified Forkert-budding, Ring budding, Annular budding and so on.

In the different methods of budding, wood is not retained in the bud-piece, except in one method which is known as chip-budding, in which a small chip of wood is also retained in the bud-piece. Retention of a small piece of wood in the bud-piece becomes necessary, particularly in plants having very thin bark as explanting of the bark with the bud becomes difficult.
Among the different methods of budding, "T" budding is, however, practiced in the majority of fruit plants, roses, and other floricultural plants. Some modification of this method done by the present author and which has been tested in Shaddock with success is described in the following.
Raising of rootstock seedlings
Seedlings were raised from seeds extracted from locally grown red-coloured fruits of shaddock (Citrus grandis Osbeck) having no named variety.
Freshly extracted, bold seeds tested by water-dipping method sown in nursery beds which were prepared by mixing 1, 0.25, 0,25, 0.1, and 0.05 parts respectively of garden soil well-rotten cow-dung, leaf-mould, neem cake and wood ash at 1.5 cm depth and 3-4 cm apart. The beds were lightly drenched every day besides drenching with 0.1 percent Blitox at 4-day intervals.
After a month when the emerged seedlings produced 4-6 leaves, those which were of vigorous growth were uprooted and transplanted in 12 cm diameter and 16 cm long pots in which coarse sand, fine sand, wood ash, leaf-mould and compost were sequentially placed to 2, 2, 1, 3 and 3 cm respectively from the bottom and the remaining part was filled with a mixture of garden soil, compost and leaf-mould. Pots were maintained in open sunny situations and regularly watered.
Several seedlings were planted in each pot, which were regularly uprooted with growth and ultimately the most vigorous one was only left to grow in each pot.

Selection of scion
Locally grown shaddock trees of the identical type of red-coloured fruits were selected to take scion buds from them. Bud-wood segments measuring 10 15 cm in length having bold, plump and healthy axillary buds were explanted from the scion trees and these were stored dipping in clean water until the buds were excised for doing the operation, i.e., not more than an hour.
Preparation of rootstocks
On the selected part of each potted rootstock plant, i.e., where long internodes existed, the matrix was made by giving incisions with budding-knife, respectively for the "T"- budding and the Modified "T"-budding methods as stated below.
(i) "T" budding: Following the conventional method, a lengthwise straight and vertical cut, measuring 3.8 4.2 cm was given. Just at the upper end of this cut, a horizontal cut was given across so that a "T" cut was made. Using the blunt end of the budding knife, the flap of the bark on both sides of the matrix was then loosened (Figure 1).
(ii) Modified "T" budding: The vertical incision was given in the same way as in "T"-budding. But the horizontal cut was given just at the middle of the vertical cut, such that a crosswise cut was formed. The flap of bark on the crotch was loosened to form the matrix. On giving this cut, an oblique cut was also given at each corner of the flap of bark adjacent to the upper side of the cut. This was done carefully with a nail clipper in such a manner that a very small triangular piece of bark was removed from the flap of each side. Removal of this small piece of bark on both sides had been done in order to avoid possible pressure that may be exerted by the bark on the bud after implanting and also to facilitate unobstructed growth of the sprout after bud union takes place (Figure 2)

Preparation of scion bud-piece
The scion stem segments stored in water were taken out and leaves and shoots present at their bases were trimmed. Healthy, bold, swollen and unsprouted buds present in them were selected for excision and these were de-bladed retaining short pieces of petioles. For each method, the bud piece was prepared as follows.
(i) "T" budding: Starting from about 1.8 cm below the bud, a cut was initiated, and this was continued upwards up to about 2.5 cm above the bud. The knife was removed, and a flat horizontal cut was given at about 1.8 cm above the bud. On doing so, a "shield" shaped bud-piece attached with a chip of wood on the inner side and the bud in the centre which was attached to the de-bladed petiole came out (Figure 3). After that, the attached wood on the inside of the bud piece was removed with the blunt end of the knife. The bud-piece was ready for implantation on rootstock.
(ii) Modified “T”- budding: In this method, the cut was initiated from about 1.8 cm below the bud and continued upwards like above. But on removing the knife, exactly a similar transverse cut was given starting from about 1.8 cm above the bud. The cut was extended downwards to reach the cut already given in the reverse direction. Thus, a bud-piece bud - piece came out. This differs from that of “T” budding in that, this was not the shape of a "shield" as in “T”-budding but looked oval-shaped (Figure 4). The wood attached to the inner side of the bud piece was removed as in the case of “T”- budding.
Implanting
The bud-piece for "T"-budding was inserted into the matrix of the rootstock by slightly widening the flaps of bark on both sides with the help of a plastic strip and slipping it downwards on the gaping cut. then slowly pushed upwards so it was that the flat cut of it fit into the flat cut made on the rootstock (Figure 5).
In the case of Modified "T"- budding, the bud was positioned with care to place it at the crossing of the vertical and horizontal cuts (Figure 6). On placing the bud-piece in both methods, it was pressed with a finger to ensure cambial contact with the rootstock leaving no gap.
Wrapping
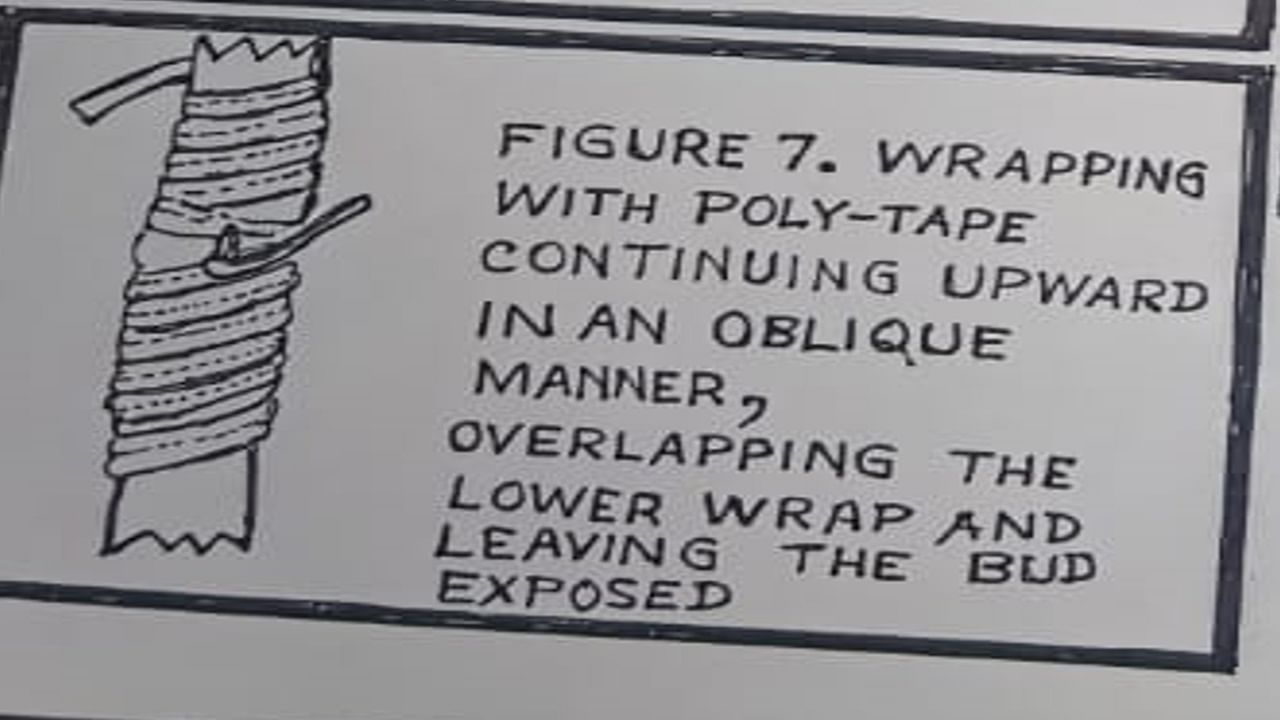
Starting from about 2 cm below the bud piece, the operated part in both cases was wrapped with black polythene tape. The wrapping was continued upwards in an oblique manner and leaving the bud exposed, the wrap was extended up to about 2 cm above the bud piece and then tied to the rootstock (Figure 7).
Observations
For each of the methods, 29 sets were performed and 5 weeks after the operation, 18 and 15 buds respectively of the "T"-budding and the Modified "T"-budding method could be observed to have sprouted, warranting cambial union and the rest dried up.
Any special merit of the designed Modified “T”- budding, i.e., cross-cut method over the conventional method of "T"-budding could not be observable as regards bud-take. However, the former method appears to be performed more easily and the chance of breakage of the flap of bark of the rootstock may be less as compared to the latter method.


